The Hauptwerk Virtual Pipe Organ
Project OPUS I - My First Hauptwerk Virtual Pipe Organ (This site is hosted on the
Raspberry Pi - a web server for £25.00
- and consuming only 5 watt!) PLEASE NOTE: in 2021 the web
address of this site changes to:
my-music.kaspencer.com (NB.: no "www") The old site-address (www.my-music.mywire.org) will cease to
exist during 2021!
In May/June 2007 I happened to come across some music software that I hadn't heard about
before. It was the MyOrgan software, and it introduced me to something that I had been
considering for many many years - since I was a teenager in fact - that of creating an
affordable pipe organ system at home. I downloaded the MyOrgan software and installed it. I
tried it with my Evolution 49-note MIDI keyboard. I admit I was a little disappointed but I
could at least see the possibilities.
My disappointments with MyOrgan were:
First, there was too much latency. I had noticed that latency had
increased anyway when I changed my operating system to Windows Vista Business (x32) from
Windows XP Professional (x32). The workstation concerned had a Gigabyte Titan 800fsb
motherboard carrying a Pentium IV 2.4GHz with 3Gbyte RAM. The audio was via a Creative Soundblaster Live! PCI card running kxAudio drivers (as Creative
Labs never had the decency to release Vista drivers for that card). I also had a set of 5.1
surround sound Cambridge Soundworks speakers with a subwoofer, so the PC could do justice to
most music;
Second the sound was subject to regular jumps or clicks on long chords, probably owing
to poor loop construction or management.
Anyway during my fiddling about with the MyOrgan software I
came to discover that several others had produced organ software of various types: JOrgan
(which I never installed) and Miditzer were the main ones. And then I found Hauptwerk from
Crumhorn Labs. I downloaded and installed Hauptwerk - this can be done without charge for
evaluation purposes but a triangle sounds regularly unless you have a licence dongle in a USB
port - and connected up my MIDI keyboard. The software includes a full set of samples for the
organ of St. Anne's parish church in Moseley near Birmingham, and I was simply astounded at
what I heard! In fact the MIDI channel that I had set for my keyboard was playing the pedal
organ! Not only was the sound the most realistic impersonation of a pipe organ that I had ever
heard, it was also completely free of detectable latency even on Windows Vista. After a bit of
investigation I soon worked out how to map the MIDI keyboard to one of the virtual organ
keyboards and I was away!
My book, entitled "All about Hauptwerk" is outlined in this
YouTube Video. The
book can help anyone investigating Hauptwerk to understand how it works and howto set up the
software. Designs for pedalboard and console are included.
My new book: "All about Hauptwerk" is available now from: Buy from Lulu and email us for a free PDF of this book
... A full explanation of how to setup and use
Hauptwerk: keyboards/ pedalboard/
expression pedals/ and controller accessories. There are designs for a pedalboard and console.
Multi-channel audio setup, convolution reverb setup, tuning and temperament are also
covered.
Soon I began to eye up my two manual plus 13-note pedal
Technics SXEA-1 electronic organ, which had MIDI-IN and MIDI-OUT sockets in the back that I
had never used in the twelve years since I bought the organ. So I ordered a MIDI-USB adapter
for £20.00, waited a day for it to arrive, and connected my Technics organ to the PC USB port
via the MIDI-USB adapter. Straight away, Windows Vista detected the TaHorng Musical Instrument MIDI-USB Device in the
adapter and installed the driver with no problem. And then, playing two manuals and the
pedalboard of the Technics organ produced sounds from the selected stops! Then I noticed that
one of the keyboards was playing the pedal organ and that the pedalboard was playing the great
organ. I went back to configuration dialogues of the Hauptwerk software, and remapped the MIDI
channels used by the Technics organ to the desired divisions of the virtual organ. Software
for viewing MIDI activity (MIDI-OX software) helped me to identify what was happening when I
played the Technics organ keys and pedals, so that I could direct to MIDI data correctly.
After a day or two of further investigation with MIDI-OX, I was able to work out how to direct
the data derived from changes of position of the expression pedal of the Technics organ to the
swell and crescendo pedal of the virtual organ, and to enable the Technics' programme control
buttons to select combination pistons and stops on the virtual organ.
All this rapidly led to the purchase of the Hauptwerk Licence and the download and purchase of
several sample sets from some UK and some European organs. Fairly soon I started to become
aware of the constraints of using my Technics organ for classical playing. The two keyboard
manuals were only 44-note each, although they were offset by an octave. But there were still
only two, and I wanted at least three! I also wanted a full compass of 61-notes! The Technics'
pedalboard was also limited - it had only 13-notes, and could only play one note at a time -
no pedal organ polyphony! Also my PC was restricting full use of the Hauptwerk software as it
could not cope with the recording facility built into the software, and furthermore, many of
the organ sample sets were simply too large for its memory capacity.
And so, the desire
to build a proper Hauptwerk Virtual Pipe Organ started to develop!
Because I now had a playable organ system, I decided that first of all I had to
build a better PC. And so I selected an ASUS P5N-SLI motherboard. This is an inexpensive board
but it supports Intel Core 2 Quad processors, and up to 8Gbyte of RAM. I also selected it
because it has 2 x EIDE ATA disc interfaces (as well as 4 x SATA) which meant that I could use
hard discs and DVDRW drives from my existing IDE stock without having to purchase SATA drives.
I bought a 2.4GHz Intel Core 2 Quad processor, and 3 x 2Gbyte DDR2 memory strips, along with
an nVidia 8400 512Mbyte PCIe x 16 graphics card, and Windows Vista Ultimate 64-bit.
I soon
had the PC built and working, but I very soon realised that it
wouldn't be long before a significant upgrade would be
required!. Windows Vista Ultimate x64 is very fast and very pretty on
the hardware selected - and so it should be! The motherboard drivers and the nVidia graphics
card are all fully compliant with 64 bit architecture, although I did update everything from
the ASUS and nVidia websites. The only problem, still ongoing is with my Creative Zen
Vision M player, which, although declared by Creative Labs and by Microsoft as being Windows
Vista 64-bit compatible, is not recognised by the operating system, in that it will not
connect owing to a failure to load a driver. Creative Labs don't seem to appreciate the
problem, so far.
Having built the new PC I then installed the Hauptwerk Virtual Organ application, which
recognised the 64-bit operating system. I proceeded to connect the TaHorng Musical Instrument
MIDI-USB Device to a USB port of the PC and to the Technics organ. I was delighted when the
adapter was recognised, and the driver was installed without difficulty. And of course my
pleasure continued when I was able to load the largest of my organ sample sets and obtain at
least twice the polyphony that was obtainable with 32-bit Vista.
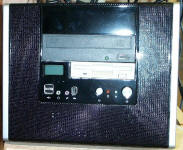
In fact, all this work turned out to be purely experimental,
because when I started work on my "proper" console, I decided to build another PC of somewhat
higher specification. This was mainly brought about by the need for a rather special case for
the PC in the organ, as a standard tower proved difficult to accommodate. Therefore I settled
on a "cube" case, which is similar to a shuttle case in design but a little larger. I also
selected a different motherboard, so that I could upgrade to 16 gigabyte of RAM if necessary,
which has been done (although now I have 32Gbyte RAM). Over two years, I moved from Windows Vista Ultimate x64 to Windows 7 Ultimate x64, from 8Gbyte
RAM to 32Gbyte, and from 1 320Gbyte IDE fixed disc, through 500Gbyte SATA, to the present
arrangement of two 2 Terabyte SATAII discs in a RAID 1 array.
The PC has evolved as the requirements of each organ has been more demanding. The current
specifications are:
Case: Motherboard: CPU: RAM: Disc: Audio OS: Monitor: PC Control: Organ Control:
EV "cube" case, uATX ASUS P8H67M-Pro (supports 32GByte of DDR3 RAM) Intel Core i5 2550K 4 x 8Gbyte DDR3 = 32Gbyte RAM 2 x 1 Tbyte SATA discs in RAID 1 array M-Audio Delta 1010LT 8-channel audio card Windows 7 Ultimate x64 19" LCD touch screen Wireless keyboard & mouse Behringer FCB1010 MIDI foot controller; 19" touchscreen and 2 x Novation Launchpad
My next task was to find the parts to construct an organ that would meet the specification of
a typical classical pipe organ. I decided that I would need:
- three 61-note manual keyboards - a pedalboard with at least 27-notes, and preferably 32-notes. It would also preferably be of
a similar design to what is known as the "Royal College of Organists concave-radiating
pedalboard". Interestingly enough, after contacting the Royal College for the specification of
this design, I was told by Andrew Macintosh of the Royal College that the College does not
actually define any standard, but that what is often called the "RCO standard" is simply that
of an organ owned previously by the College, and he kindly sent me all of the critical the
dimensions of its console and pedalboard; - at least one pedal for continuous control of a crescendo or a swell control.
I set about searching for suitable
61-note MIDI keyboard controllers. At first I was rather put off by the
price - it seemed that to equip my organ three manuals would cost me
well over £1,500 if I purchased keyboards from the manufacturers of what
are probably very high quality keyboards with built-in MIDI combination
switches and with so-called "tracker action". I found a supplier of much
more economical 61-note MIDI+USB keyboards, and decided to purchase one
for evaluation. At the same time I was searching for a MIDI Merge unit that
would enable me to connect 4 MIDI devices through one MIDI port, and
decided to purchase a Tapco MIDI-Link 4x4 unit.
The MIDI-Link unit arrived first
and I was pleased to discover that it was recognised straightaway by the
Windows Vista Ultimate 64-bit operating system, and that the four MIDI
inputs were displayed clearly within the Hauptwerk configuration
dialogues.
Then the keyboard arrived: first of all I plugged it into the Tapco MIDI-Link and was very pleased that it
seemed to work perfectly, and
without detectable latency. Then I disconnected the keyboard from the
MIDI-Link and plugged it into a USB port directly, as the keyboard also
had a USB socket. I was then further delighted to discover that the
keyboard was in fact equipped internally with a TaHorng Musical
Instrument MIDI-USB device identical to the device that I had already
purchased separately, and that this device was also recognised by the
operating system and was available in the Hauptwerk configuration
dialogues. And so I decided to purchase two more identical 61-note MIDI
keyboards. When the two others arrived, I was easily able to connect
them to the PC, either using the USB ports built into the keyboards, or
using the MIDI outputs of the keyboards connected to three of the four
MIDI inputs of the Tapco 4x4
MIDI-Link. This meant that I would be able to have considerable
flexibility in the organ design, leaving me plenty of options for
connecting a pedalboard controller, a MIDI expression pedal for
continuous control, and possibly other MIDI switches for stop control or
combination piston controls as my design developed.
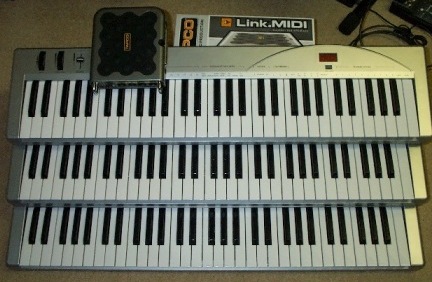
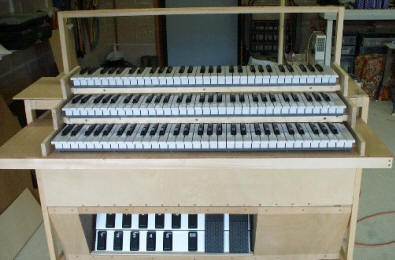
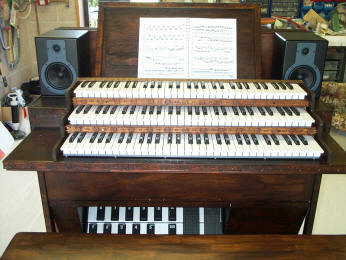
Here are the three keyboards
and the Tapco 4x4 MIDI-link: The three 61-note MIDI-USB keyboard manuals The Tapco 4x4
MIDI-Link unit is shown placed on the upper keyboard
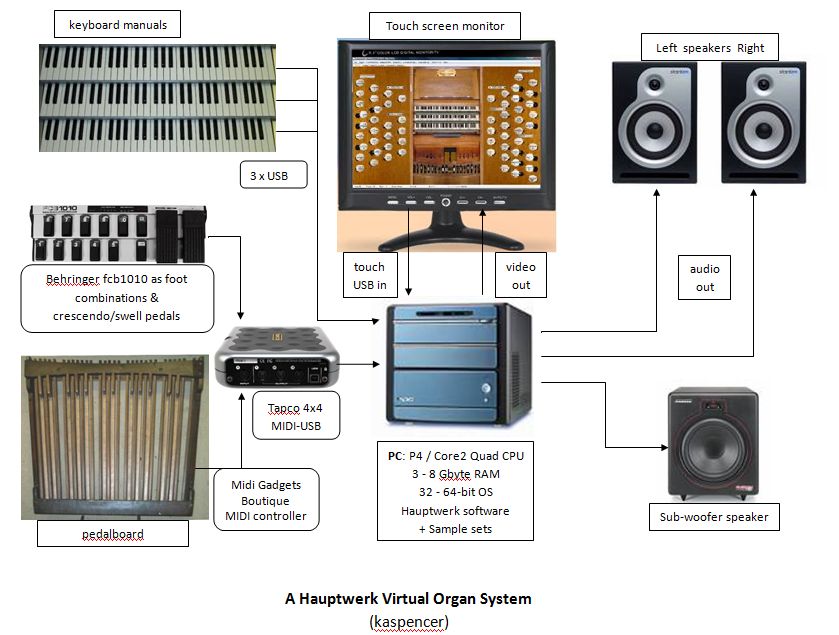
Here is how everything will fit together:
I did actually find two issues with these keyboards: first that they
were inclined to suffer "ciphers", that is notes which stick on owing to
failure of a MIDI-note-off message. My distributor contacted the
Taiwanese manufacturer and they reported that they had replacement PCBs
which would resolve the issue. In due course, three PCBs, now labelled
as manufactured by Citizen, arrived and I connected them up.
Unfortunately, there was still some evidence of ciphers, though a little
less frequently. The new boards however did not perform their software
reset properly, and I am awaiting further modification. This issue can
be worked-around in the meantime.
The second issue was more one to do with the Windows Class driver for
Audio/Music devices: namely that three identical devices are given the
same name - The Hauptwerk software was content to distinguish each
keyboard device by its USB Enumeration ID - until the software was
shutdown and restarted, when it promptly forgot the previously held
enumeration IDs and claimed that all three devices were using the same
name. We could work around this by switching the keyboards on in a
defined order and assigning each a unique MIDI Channel. But then, Martin
Dyde, most co-operative author of Hauptwerk promptly issued
version 3.21 which relieved us of this necessity by storing and re-using
the first enumeration IDs, provided that the keyboards remained in the
same USB sockets.
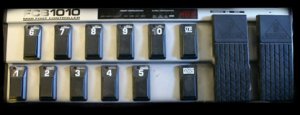
For organ control
To supplement the
touch screen, I also purchased a Behringer FB1010 MIDI foot
controller unit. This has two MIDI routable expression pedals,
one of which is used for swell pedal and the other for the
crescendo pedal of the organ. There are also 10 MIDI
programmable foot switches which are used for combination
pistons.
There is also a Novation Launchpad which has 64 or 80 MIDI switches.
For the delivery of the audio The PC is equipped with an
M-Audio Delta 1010LT 8-channel soundcard. Initially, I decided to use only two channel (stereo) at present
as I had only the basic edition licence for Hauptwerk version 3. I therefore purchased
two M-Audio BX85a speakers and a KEF 125 sub-woofer. The BX85a speakers are bi-amplified studio monitors
delivering 85 watt RMS each, and the KEF 125 sub-woofer delivers 125 watt RMS of audio power. After obtaining the licence for the Advanced Edition of Hauptwerk, I subsequently purchased four more
speakers: these are two Samsung Resolv A6, which are bi-amplified 100 watt each, and which I use for
many 8' 4' and mixture ranks, and two Pulse 50 watt speakers for mainly 2' ranks, giving me seven
speakers altogether.
So far so good - but I would not begin building the console until I
had decided what to do about the pedalboard, as I would need to see how
things would fit together before committing myself to any final
dimensions and design. At first I considered constructing a
pedalboard myself and even located a source of suitable wood in a local
do-it-yourself store. I had the dimensions from the drawings kindly
supplied by Andrew Macintosh of the RCO. But I decided that that would
be an option of last resort.
My Pedalboard Source
I decided to contact a supplier of
assorted organ components near the south coast. He had an RCO organ pedalboard for sale at £70.00, but it was not in very good condition and
would need some repair and attention. I hesitated at driving down
speculatively and then paying £70.00 for something that might not be
what I had hoped for. I bided my time, regularly checking the Hauptwerk
forums for items for sale.
Then one evening when I was rummaging
about in eBay, I discovered a concave-radiating 30-note
pedalboard for a starting price of £4.99, or buy-it-now price of
£30.00 - and no bids! There were photographs, and a description
- although it was Victorian (some 100 years old at least) it
seemed to be in reasonable condition. So I decided to bid £5.00
rather than buy it at £30.00, and to watch what happened to it.
There were no more bids so after the due period it was mine for
£5.00 - a bargain really, even though I accept that probably
hundreds of similar pedalboards have ended their lives on
bonfires in recent years.
I drove the 130 miles
from my home one
Sunday afternoon, and squeezed the large wooden contraption into
the back of my wife's car, and returned safely with it! What a
weight it was, getting it back out of the car. No doubt though it
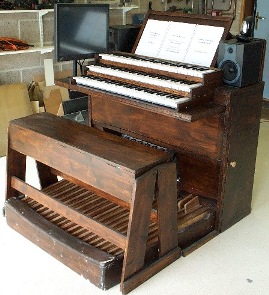
will do the job, and here it is - before being cleaned up and
re-stained, but it is fully serviceable:
The RCO-style concave-radiating
pedalboard all for a fiver and a 240 mile round trip!!
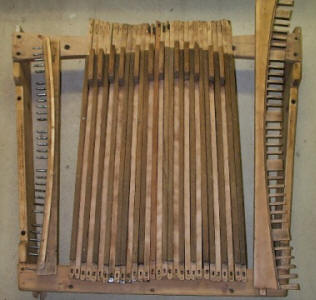
Preparing the pedalboard for use Cleaning up the old pedalboard proved to be a dirty job, but a sanding
machine and loads of sugar soap solution are slowly revealing the
original wood. The pedalboard is now completely cleaned re-stained and
varnished. Parts of it look as good as new, although some of the pedal
key-top woods are a little worn with a few generations of organists'
feet! It certainly looks good now it is cleaned up.
All the parts of the pedalboard cleaned and ready for
re-staining
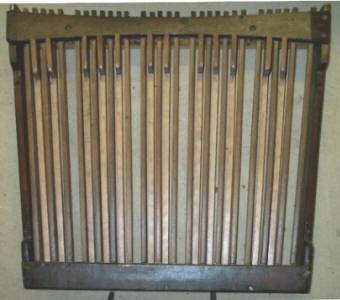
The pedalboard restored, stained and ready for MIDIfying
I found that several different systems of linking the toe-ends
of the pedals to the tracker mechanisms had been used over the
years, and as a result the toe-ends of all of the pedals were
quite damaged. Therefore I repaired them all by cutting off 2-3"
from the end, and glueing new wood in replacement. This was necessary because each toe-end will have to take a long
screw to support the small magnet that will act on each
reedswitch when the pedal is depressed. At the same time new leather anti-rattle strips were fitted.
And so, the pedalboard frame has now been re-stained, and the pedals
re-varnished, and the whole thing re-assembled.
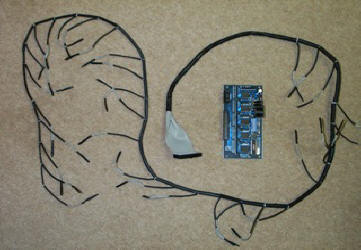
The Pedalboard MIDI system I selected is the MIDI Gadgets Boutique MPC32xr card. This is a highly
professionally made circuit board manufactured in Bulgaria. Like many of
these devices it is rather more expensive than you'd expect, but it
works well and is very well designed and made. It has a 34-pin connector
for connecting up to 32 pedal switches, and a 10-pin connector that can
be used for up to 8 other switches. It provides a MIDI-out DIN socket
and a 9-12V ac/dc power input socket. An 8-way DIP switch allows for
octave transposition, MIDI channel number, and open/closed pedalboard
key switch detection. There are several methods available for switching
the pedal notes on and off. I decided that I would save time and effort
by purchasing a pre-configured manufactured 32-switch loom from MIDI
Gadget Boutique rather than construct my own. This system is a neatly
made array of reed switches connected in a loom in heat-shrink sleeve
with a 34-pin IDC connector. which are closed when a magnet comes into
close proximity to the nearby reed switch. MIDI Gadget Boutique supply
32 tiny but powerful magnets - one is fitted to the moving
extremity of each pedal key to operate the reed switch when the pedal
key is depressed with the foot.
The MIDI Gadgets Boutique circuit board and 32 reed switch wiring loom
to be used to MIDIfy the pedalbaord
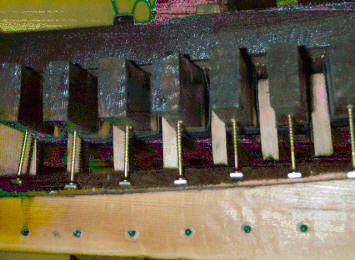
Screws are fixed into the toe ends of each pedal key, and tiny magnets
are glued on. The reed switches can be seen protruding slightly from
holes drilled into the pedalboard base
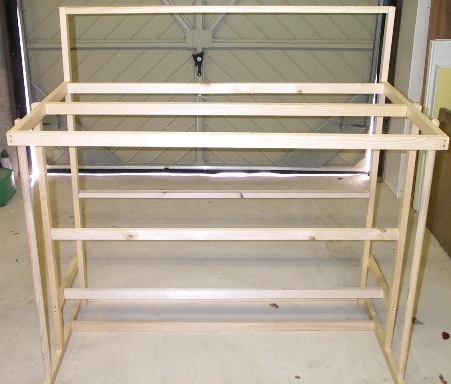
I am now ready to build the new console. I decided to construct a
frame which could fit snugly around the pedalboard, but which could
be disengaged so as to allow it to be transferred to the my office
which is on the first floor of our house. Although the pedalboard
and the console are substantial and quite heavy, dismantling them,
along with enabling the keyboard manual block to be dismounted, will
make the transfer easier.
Console Dimensions
For those that are interested in building their own console
from scratch, as I have done, there are really only very few
dimensions that are truly critical. And they are critical because
not only do
you not want to go to a strange organ having become used to
your own (incorrectly dimensioned) console, only to find that the
pedals are in the wrong position, but nor do you wish to invite an
organist to play your console only to be told that you have
incorrectly positioned this or that. So, remember these key facts
about organ console dimensions:
- offset,
vertically, each successive manual keyboard in your stack, so that
it is 2.5" above the one below it;
- offset,
horizontally, each successive manual keyboard in your stack, so that
it is 4" behind the one below it;
- always
ensure that D3 on each keyboard manual is directly above the D2 key
on the pedalboard. This is regardless of the number of keys on the manual or the
pedalboard;
- position the lower manual keyboard 30 inches above the upper surface of
the D2 key of the pedalboard;
- make your organ bench seat-top 21.5 inches higher than the D2 key of the pedalboard;
- position your swell pedal centred between the E2 and F2 keys of the
pedalboard;
- position your crescendo pedal to the right of the swell pedal, and your choir swell pedal on its
left, if you have more than one pedal.
The absolute minimum width of the console is determined by the toe end width of your
pedalboard: for a 30-note board this will be approximately 45-47 inches. This is wider than the
61-note keyboard, and although does not leave room for wide side jambs, it is possible to
construct a fully functional console of that width. My console is just over 46 inches wide (this is the front width of
the pedalboard frame), 46 inches high at its highest point, and 28
inches front to back. The frame is made mainly of 22mm x 38mm
spruce. The width was set by the space which I had to accommodate the organ in my studio/office. Console Construction
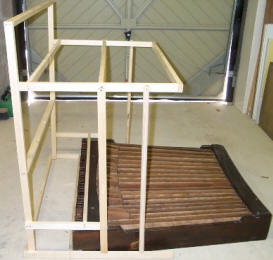
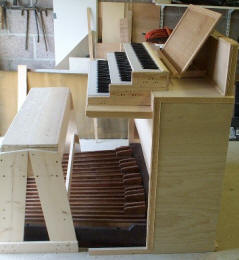
The console frame from the side
The console frame from the front
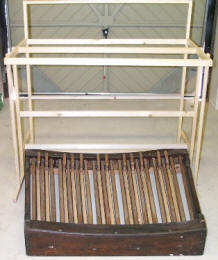
Console frame and pedalboard from the front
Console frame and pedalboard from the side
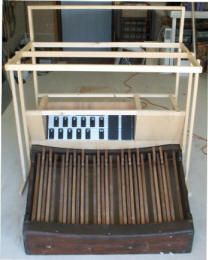
The controller niche
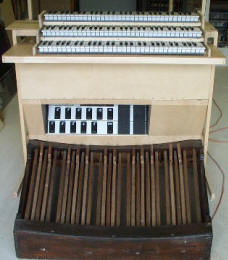
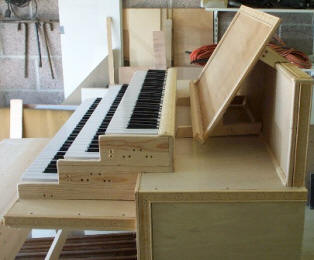
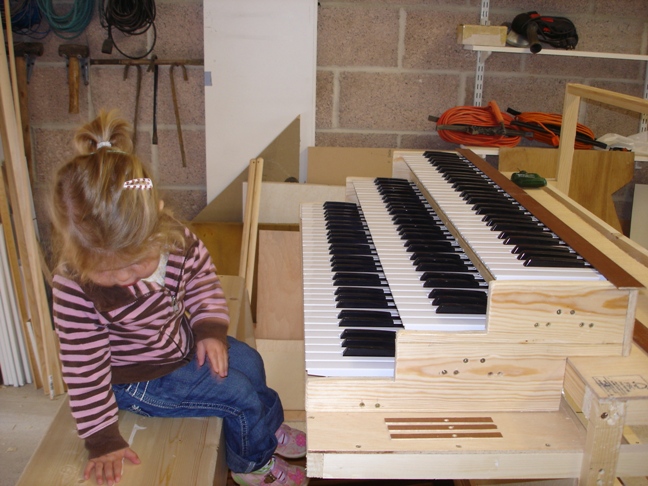
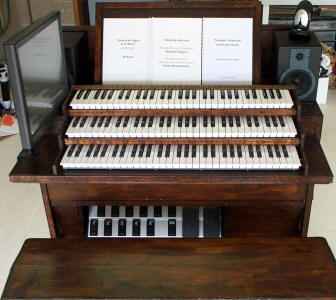
Manuals
in situ
Close-up of the keyboard beds
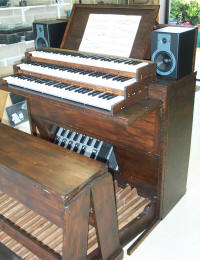
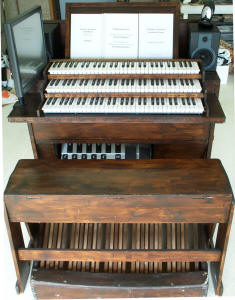
Console and bench
Side view of console
Close up of console, music stand & manuals
Stained and ready for PC & MIDI installation
Slightly closer ...
I can't wait to start playing ...
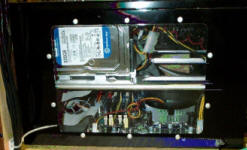
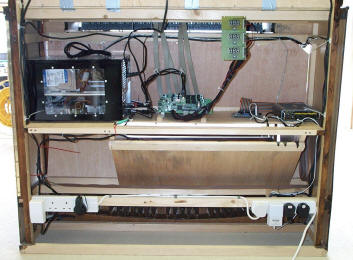
Inside the back L to R: PC, three manual keyboard PCBs,
pedalboard PCB, 4x4 MIDI device
Space has been allowed for in the upper section of the console, under
the keyboard manuals, to house the PC and five PCBs. Three PCBs are
required one for each keyboard manual, and one for the pedal organ, and
one for MIDI stops and combinations, although the latter will not be
added until much later in the project. A niche has been provided in the
lower section of the front of the console body, immediately above the
toe end of the pedalboard, to house the FCB1010 MIDI foot controller
unit.
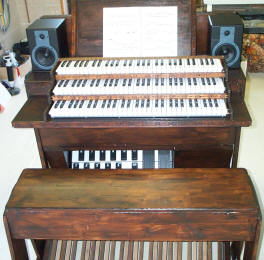
The process of enclosing the console in
plywood board is complete. The
MIDI foot controller, which provides crescendo (on the right) and swell
(on its left) pedals. There are also ten programmable foot switches
which will allow selection of the stops and combinations of the pedal
division. A three-level keyboard bed stack has been constructed the three keyboard manuals have been mounted in
it. The design details are available in the link. A music stand and space for the near field monitor speakers has been provided behind the keyboard
stack. After providing a little finishing touch by applying some decorative moulding, the entire console was
stained with a dark walnut stain.
A substantial organ bench with music store, has been constructed. This was also stained in dark
walnut. The design details are available on the right. (Please note this is NOT the separately available High Quality Organ Bench.)
The organ is at last complete! And playable! The PC and three PCBs with
their controller boards, for each of the three keyboard manuals
are now in place and the MIDIfied pedalboard is connected to the MIDI
Gadgets Boutique PCB. This is in turn connected to the Tapco 4x4 MIDI
device controller, along with the Behringer FCB1010 foot controller
board. There is rather little by way of internals in an organ of this
design, and so it has all fitted together very well.
The organ is now fully playable! One of the
pedal reed switches, the Bb2, was found to be broken, but was
soon replaced, and there was one conductor in
one of the 16-way ribbon cables connecting the upper manual that was
faulty. These were be
trivial problems to correct. With the KEF subwoofer the organ is just
about capable
of playing a 32' pedal rank.
The Behringer FCB1010, once configured, proves to be exceptionally
useful, because for most organs, the provision of the equivalent of
ten general foot operated combination pistons is a truly useful
resource. I know that many people use their touchscreens almost
exclusively for pulling stops and other functions. But the FCB1010's
foot switches are so convenient for combination selection that all one
needs to do by touchscreen, for the most part, is to make adjustments on
a stop-by-stop basis. In addition, of course, the two expression pedals
which it provides, supply both a swell and a crescendo pedal, which is
also truly useful.
For those who are interested, this is how to set up the FCB1010:
Begin
by tapping foot switch 1, to select the first bank of presets when you
start your organ PC and bring up the Hauptwerk software. Then, in Hauptwerk, make the following adjustments to
General Settings ->
Utils & Pistons: - under General Combinations 1 - 10 select the MIDI Event Numbers 1 - 10
respectively. Then under General Settings ->
Continuous Controls, make the following
adjustments: - under Crescendos General, select Controller Number 007 (Main Volume).
This is Pedal A on the FCB 101; - under Swells General, select Controller Number 027 (User Defined). This
is Pedal B on the FCB 101. When you configure an individual organ under
Organ
Settings, use General Combinations 1 to 10 and set the first ten
general combinations of the organ. Ensure that you select Crescendos
General for the crescendo pedal and Swells General for the swell
pedal(s).
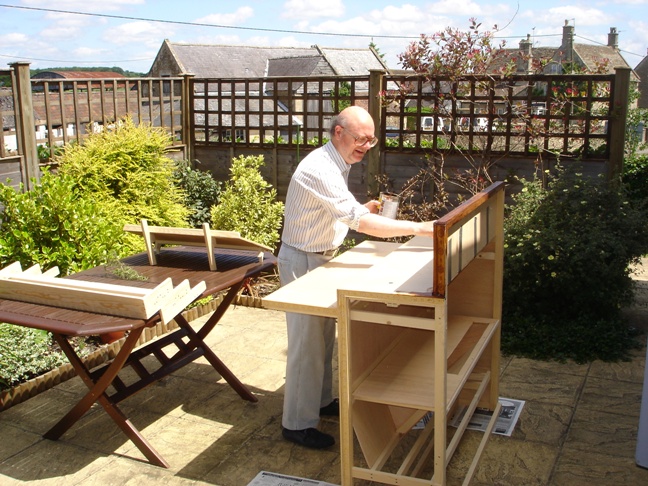
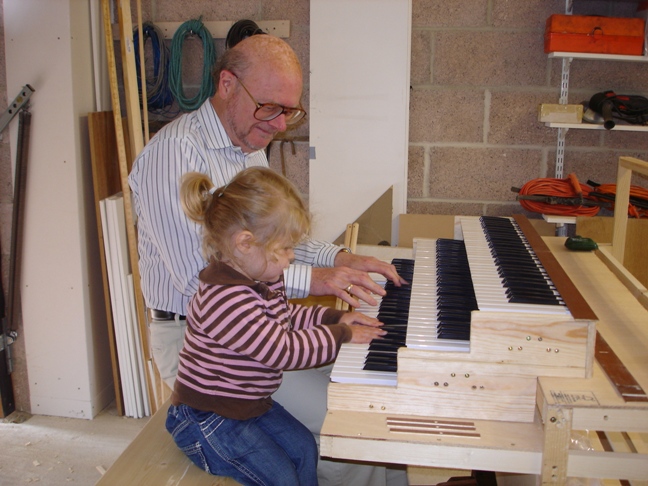
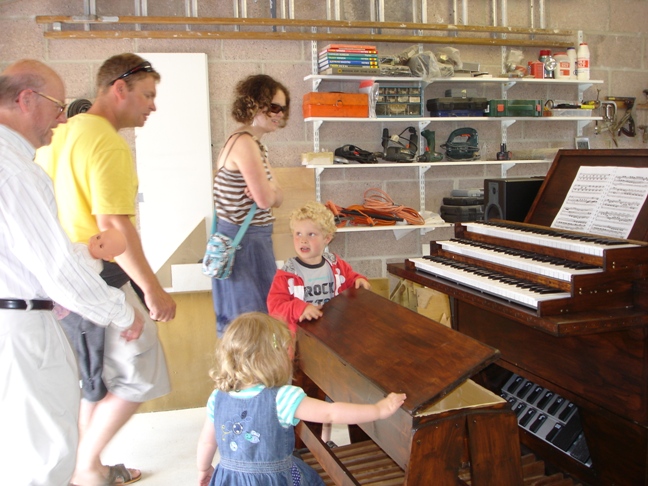
Above: Isabelle inspects the console
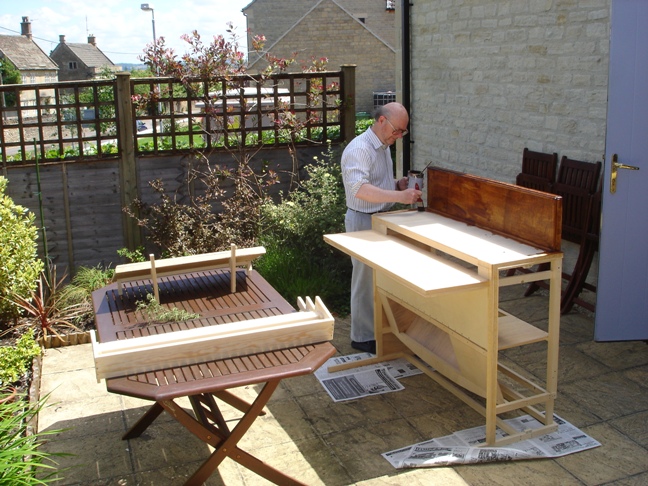
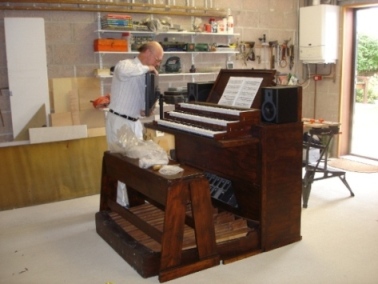
Above: Staining the console
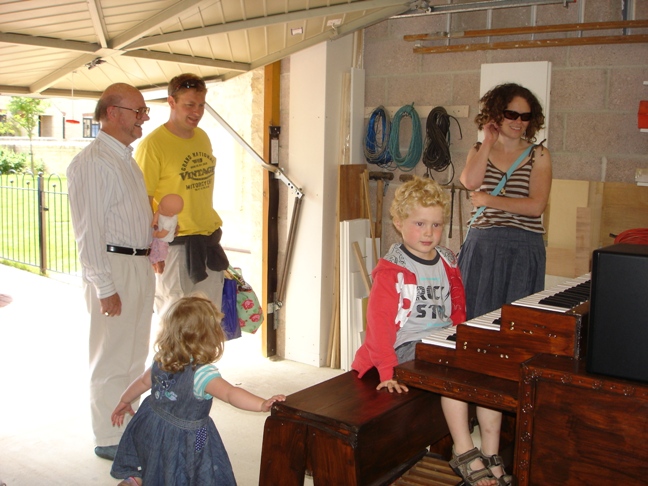
Tommy decides its OK
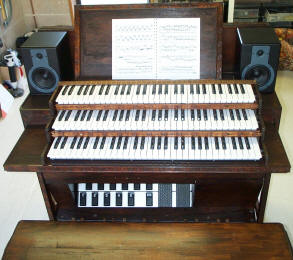
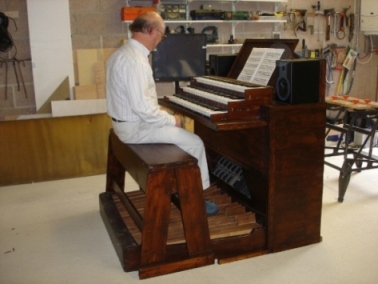
A view of the entire organ, showing the 19" touchscreen and organ bench.
Inside the back L to R: the PC, three manual keyboard PCBs &
control boards, pedalboard PCB, 4x4 MIDI device
I may look at the possibility of providing some physical stops and
combinations, acting via a second MIDI Gadgets Boutique PCB, and maybe enhancing the audio channel
setup by acquiring the advanced user licence for the Hauptwerk software. (Both developments have since been carried out.)
The 19" touchscreen provides all necessary control whilst the organ is being
played. A wireless keyboard and mouse provide control of the PC, but are hidden in a niche behind the
music stand once the organ is loaded and ready for playing.
A closer view of the upper
part of the organ, including the Behringer FCB1010 foot
controller unit which provides swell and crescendo pedals as
well as ten foot switches to act as combination pistons or
stops.
Fitting the touchscreen
The finished organ
Now it's finished, can I play it, and can I get it up the stairs to my office?
In December 2013I published a six-page article in the Organists' Review Journal.
This article explains many aspects of the Hauptwerk Virtual Pipe Organ to conventional pipe organ enthusiasts
who may be considering constructing their own Hauptwerk organ.
The article can be read from the Organists' Review website, athttp://organistsreview.com . Whist the
December 2013 issue is current you can click on the Latest Issue or the Current Issue link to read the
article. Once the December 2013 issue is no longer the current issue you can click on the Past Issues
link.
In July 2020, after 12 years of faithful service, my Hauptwerk Console OPUS I
went to a new home. When I designed & built it in 2008, it had only a touchscreen for its controls, and only
a two-channel stereo output. After 12 years it had gained two LaunchPads for control, and three more stereo
sound channels. So now it is all ready for packing into a van and off it goes.Its vacated place in my music room
will be occupied by my almost (98%) complete OPUS II (see the link to OPUS II at the top of the page).
Bon Voyage, OPUS I !
More Items of Interest for the Virtual Pipe Organ
Combination Set List - Palace of Arts, Budapest
I have prepared a Combination Set List for the
PAB Medium Edition. It details 29 combinations for use with this quite large instrument.
I hope to do the same for the PAB Professional Edition soon, but that is an even bigger task!
The combination list can be downloaded via the link to the right.
Novation
LaunchPad Overlays We have
produced several A4 transparency
overlays for the Novation LaunchPad, for use with Hauptwerk. - Esztergom Collectors' - Haverhill OIC Extended - Hereford Volume II (46 stop) - PAB Medium - PAB Professional - Salisbury Volume I - St Anne's Moseley
Lavender Audio, David Butcher
(vol I 23, vol II 46, vol III (full) 67 stop with
extensions)
Methodist Chapel in
Prudhoe, Northumberland
?Nelson & Company, Durham
Mark Beverly
Salisbury Cathedral in
Salisbury, Wiltshire
Henry Willis (Father), 1877
Milan Digital Audio (volumes 1, 2, & 3)
Australia
Church of St Augustine
Neutral Bay, NSW
Hill Norman & Beard, 1929
Nicholas Appleton
Church of St Stephen
Penrith, NSW
Charles Jackson, 1877
Nicholas Appleton
Belgium
Church of Notre Dame
Laeken
Schyven/Van-Bever 1874
Pipeloops (small edition)
Church of
Roeselare
Prajawidya 1995
Sygsoft (An organ comprising bamboo pipes)
Czech Republic
Home organ in
Prague
Positiv, Daniel Prib, 2007
Sonus Paradisi
Monastery at
Zlata Koruna
Abraham Starck z Lokte, 1698
Sonus Paradisi
France
Cathedrale, en
Forcalquier
Marchand 1627, Cavaille-Coll & Mutin, 1932
Sonus Paradisi
'Home' orgue en
>
Orgue Salon, 1988
Soni Musicae
L'Eglise St Madeleine en
Paris
Aristide Cavaille-Coll, 1846
Pipeloops
L'Eglise St Eucaire, en
Metz
Cavaille-Coll & Mutin, 1902
Milan Digital Audio
Germany
Home organ in
Gottingen
Dieter Ott 2003
Christian Datzko
Hungary
Church of the Blessed
Virgin Mary & St Adalbert
Ezstergom
Ludwig Mooster, 1856
Inspired Acoustics (collector's edition)
Palace of Arts in
Budapest
Pecsi-Mulheisen, 2006
Inspired Acoustics (medium, professional, extended and gravissimo editions)
Church of St. Imre in
Pusztaszabolcs
Pazicky, 1778
Inspired Acoustics
Italy
Church of St. Maria d'Alieto
Izola, Adriatic
Pietro Nacchini, c1770
Sonus Paradisi
Church at St Carlo
Brescia
Antegnati, c1630
Sonus Paradisi
Netherlands
The Magnuskerk
Anloo
Radeker/Garrels/Schnitger,
1718
Prospectum
Church of St. Maria
Oosterwijtwerd
HE Freytag, 1845
Sygsoft
Spain
Cathedral of St Augusti
Palma, Majorca
D& S Caimari, 1702
Sonus Paradisi
Sweden
Church in
Burea
Hammarbergs, 1967
Lars Palo & Graham Goode
USA
Redford Theatre
Detroit
Barton 3/7 Theatre organ
Graham Goode (South Africa)
First Baptist Church
Riverside, California
Schantz, 1966
Evensong Music, Jonathan Orwig
Virtual Organs comprising pipes from more than one organ or country
Brut-Leuchten
composite
Bob Collins in the USA
Enigma Wet v3
composite
Al Morse in the USA
South Suffolk
composite
Lavender Audio in the UK
Paramount 310
theatre organ (free edition)
composite
Paramount Organ Works in the UK-USA
Paramount 320
theatre organ
composite
Paramount Organ Works in the UK-USA
Sampled Instruments other than pipe organs
Instrument
Location
Features
Sample set provider
Clavichord
St Maxim, Provence, France
4 octave, single manual
Hauptwerk.cz (Czech Republic)
Harpsichord
Copy is in Krakov Original is in
Charlottenburg
copy of 1710 instrument by Michael Meitke. Two manuals.
Hauptwerk.cz (Czech Republic)
Carillon (bell peel, Beiaard
) in
Ghent (Gent)
Gent, Belgium
54 bells played by a keyboard
Soni Musicae
-----------------------------------
If you are interested in any of the components used in this organ or wish to know any more
constructional details, feel free to contact me at the email address below.
I am also willing and able to build PCs for use with Hauptwerk, for users in
the UK, usually from about £1,300. I can usually supply 15", 17" and 19" CTX, and 22" WS Iiyama touchscreens to users in the UK.
There is a leaflet here (see last page). If you are interested in having a full organ console built, of similar design but by a professional
woodworker, and you live in the UK
and can drive to Wiltshire, feel free to contact me, as I have an arrangement with a very highly
skilled woodworker who will build a console to an agreed specification. You should be warned, however,
that such a console is likely to cost about £10,000.